Artists and writers use AI gender swap as a fast character reference tool. You start from one portrait, a photo of yourself or a consenting model, and get a believable opposite-gender version that keeps the same face. That gives you something concrete to study when designing a genderbent character, drawing features you are less used to, or keeping a character recognisable across versions. It is a starting point for your own work, not a finished design, and it works best when you treat it like any other photo reference: useful, imperfect, and checked against reality.
Example: one base, two variants
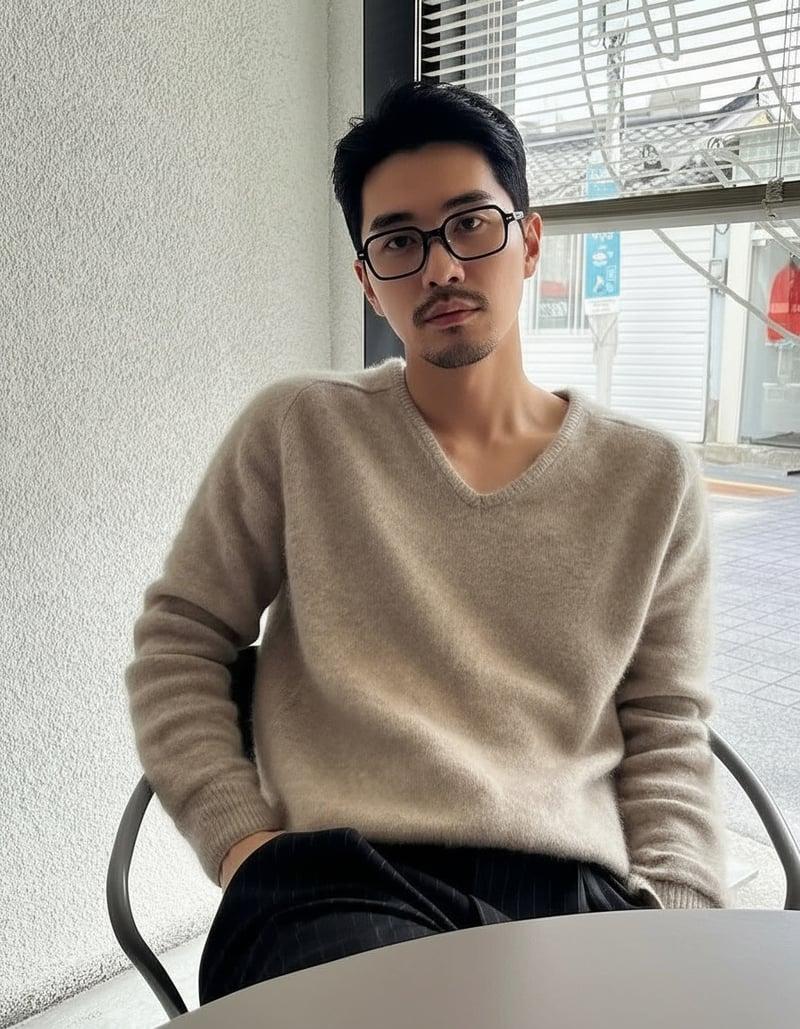
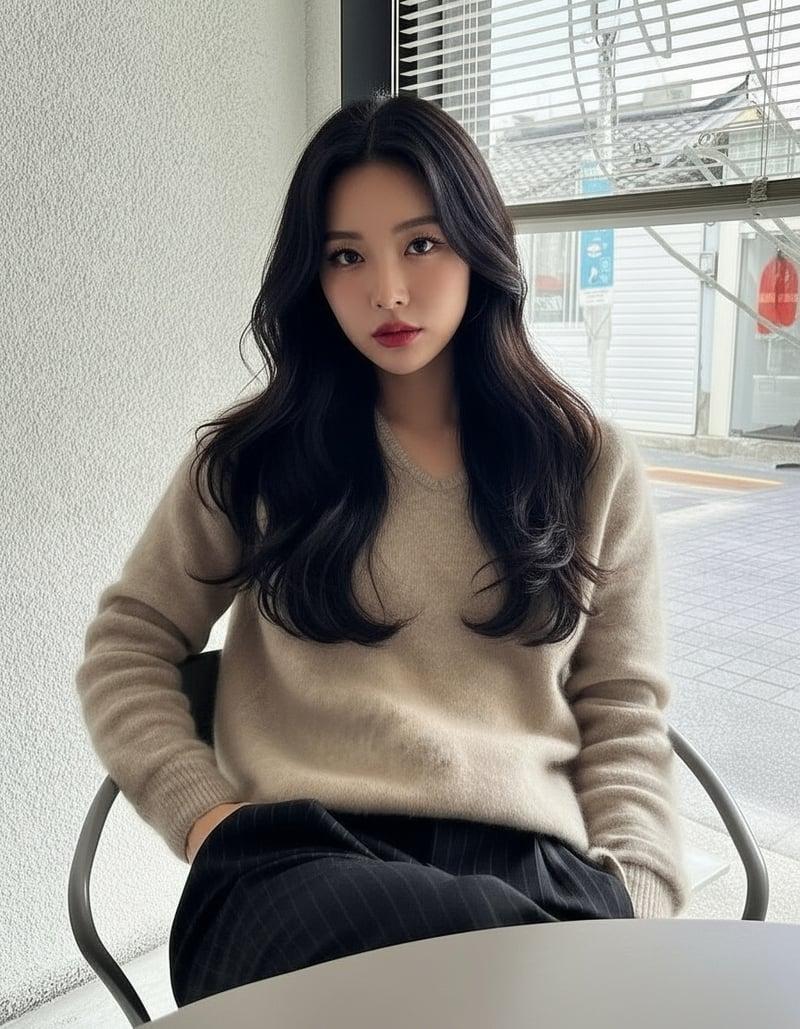
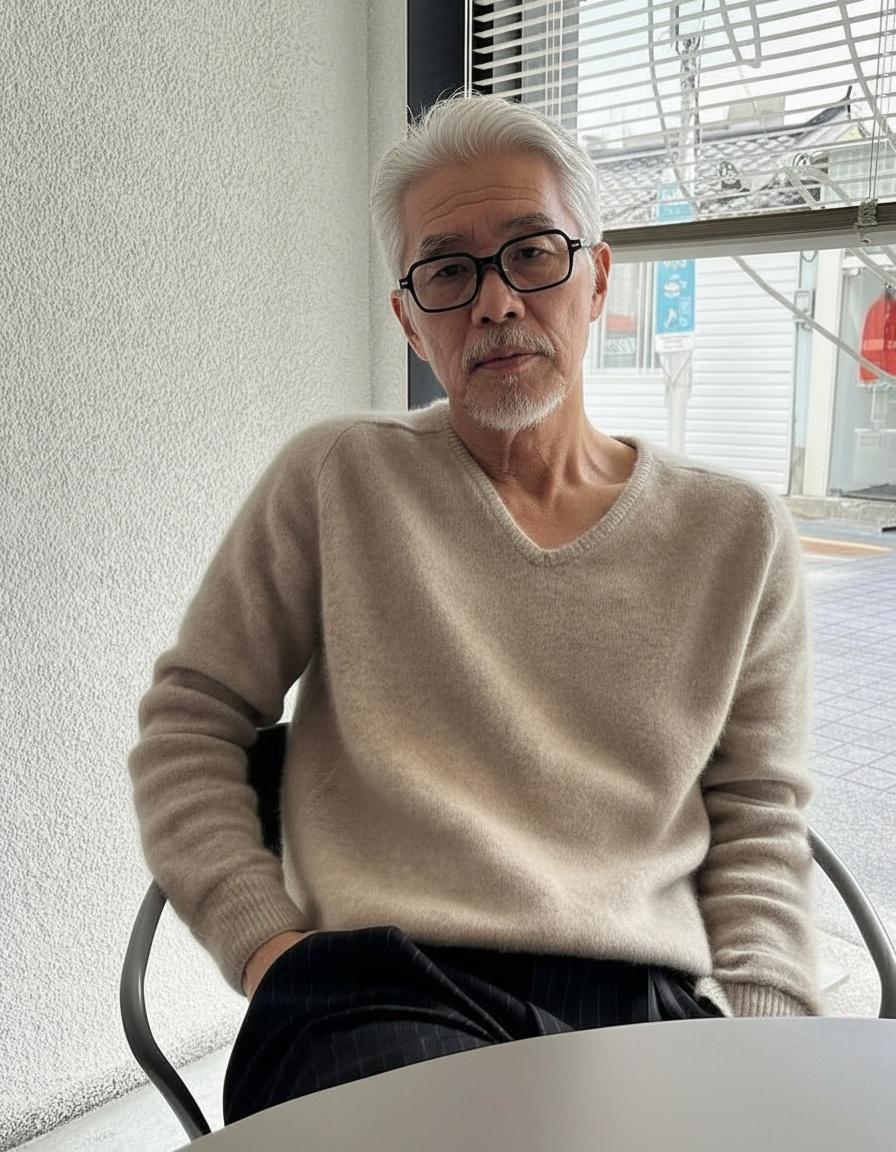
One base portrait, a gender swap and an age variant. The pose, clothing and setting stay constant, so you can study exactly what changes: hair, brows, jaw, skin and glasses. Results vary from photo to photo.
What it is good for
| Use | How the swap helps |
|---|---|
| Genderbend character design | Shows how one face changes with a different presentation, so the character stays recognisable |
| Portrait studies | Gives a reference for features you draw less often, such as a heavier brow, a beard line, or a softer jaw |
| Character variants | Alternate-universe or "what if" versions of an original character |
| Casting for prose | A visual anchor for a character you have only described in words |
| Spotting habits | Comparing versions shows when your designs default to the same stereotypes |
| Client and team communication | A quick visual for "something like this, but as a woman/man" |
A practical workflow
1. Pick a clean base portrait
Use a sharp, front-facing photo in even light, with no beauty filter. The cleaner the base, the more consistent every variant will be. It should be your own photo or one from an adult who agreed to it. See best photo for AI gender swap.
2. Decide what you are testing
Write one sentence before generating: "How would this character's face read as male?" or "What hairline suits the female version?" A clear question keeps you from collecting dozens of images you never use.
3. Generate the swap, and age variants if useful
Run a gender swap in the online generator. For a character across a timeline, use Age Transform on the same base (older or younger, 5 to 40 years) to keep the face consistent. For costume ideas, Cosplay mode puts the face into a styled outfit. Each standard generation uses 1 credit; sign up for 1 free standard generation, delivered as a watermarked preview up to 768px, and any one-time credit pack unlocks full-resolution originals. See age transformation.
4. Study, then draw your own
Put the original and the swap side by side and note what actually changed: brow height and thickness, jaw width, cheek volume, hairline, neck. Then sketch from your notes and your own knowledge, not by tracing. The reference tells you what to look at; the design decisions are yours.
5. Keep a reference sheet
Save the base, the swap and any age or costume variants together, with a few notes. It keeps a character consistent across chapters, panels or commissions.
Exercise: one face, four variants
A quick exercise that works for character design and for practice:
- Take one base portrait.
- Generate a gender swap.
- Run Age Transform on the base: 20 years older.
- Run Age Transform on the swap: 20 years older.
- Lay the four images out in a grid and draw each one in your own style in ten minutes or less.
You will see which features carry the identity across all four (usually the eyes, nose and expression) and which change with gender or age. Those constant features are what make a character recognisable in a redesign.
Reference sheet template
| Field | Example entry |
|---|---|
| Character | Name, role, age |
| Base portrait | File name, source and permission |
| Variants | Gender swap, +20 years, costume look |
| Constant features | Eye shape, nose bridge, smile |
| Changed features | Brow weight, jaw width, hairline |
| Design decisions | What you kept from the reference, what you changed on purpose |
| Errors to ignore | Ear shape, glasses frame, background artifacts |
Problems and fixes
| Problem | Cause | Fix |
|---|---|---|
| Variants do not look like the same character | Different base photos or lighting | Use one base photo for every variant |
| Reference looks generic | Low-resolution or filtered base | Use a sharp, unfiltered portrait |
| Features exaggerated | Model leaned on stereotypes | Treat the swap as one end of a range and design in between |
| Odd details in hands, ears or glasses | Common AI errors | Correct from real photo references |
For writers
A generated portrait can make a character feel real enough to write: how they look tired, how they look dressed up, how others might react to them. It also helps with consistency. If a character's appearance matters to the plot, a reference image keeps details from drifting between chapters. Keep the image as private notes; readers should imagine the character from your words.
For illustrators and designers
- Use it for structure, not style. The value is in how the face changes. Your line, colour and stylisation are still yours.
- Check anatomy against real references. AI can soften or exaggerate features. Cross-check against photos of real people.
- Watch the details AI gets wrong: hairlines, ears, glasses frames, teeth and hands. Do not copy errors into a finished piece.
- Use it as a warm-up. Drawing the same face as two presentations is a quick exercise in seeing structure.
Avoiding stereotypes
Gender swaps can lean on clichés: longer lashes and fuller lips for "female", a beard and a square jaw for "male". Use the result to notice those defaults, then decide on purpose which ones your character needs. Many believable characters sit somewhere between the two versions.
Limits and rights
- It is a reference, not a source of truth. Generated faces are interpretations.
- Real people need consent. Do not create references of real people without permission, and never use photos of minors.
- Fan characters have owners. Genderbent fan art of an existing character is still that rights holder's character.
- Check the Terms before commercial use. You keep your rights in the photos you upload, but read GenderFlip's Terms and any applicable character rights before selling or publishing work based on generated images.
FAQ
Is it okay to trace an AI gender swap?
Use it to study structure and draw your own version. Tracing copies the model's errors and produces stiff work.
Can I use a photo of a celebrity as a base?
No. Use your own photo or a consenting adult's. Using real people's faces without permission raises privacy and publicity issues.
How do I keep a character consistent?
Use the same base photo for every variant and keep a reference sheet. Age Transform on the same base keeps the face consistent across ages.
Can I use it in client work?
As private reference for your own drawing, it works like any photo reference. If a generated image itself goes into a deliverable, check GenderFlip's Terms and your client contract first, and tell the client that AI was used. Many clients and publishers have their own AI policies.
Which direction should I generate first?
Generate the direction your character needs, then the original direction aged or styled, so you can compare. If you are unsure, generate both: the comparison often shows which features the character depends on.
Is the free preview enough for reference?
For a quick look, yes. For close study of skin, hairline and brows, the full-resolution original from any credit pack shows much more detail.
Does it work for stylised or anime characters?
The gender swap is built for realistic portraits. Use the result as structural reference, then stylise it in your own drawing.